According to Wikipedia, a mail merge "is a software function describing the production of multiple (and potentially large numbers of) documents from a single template form and a structured data source." Basically, what that means is that, with a mail merge, you can link a document (such as a form letter or address labels) to a data source (such as an Excel Spreadsheet or an Access Database). In this tutorial, I will be showing you how to do a mail merge to create address labels using Word 2010 and an Access 2010 database.
Address Labels
To start the process of creating address labels in Word 2010 utilizing an Access database, click on the Start Mail Merge button in the Start Mail Merge group under the Mailings tab and select Step by Step Mail Merge Wizard.
The Mail Merge pane will appear. You would then select the type of merge you want to do (in this case, it would be labels). After you have made your selection, you would click "Next: Starting document".
Next, you will be given a choice to select a starting document and to change the document layout. Click on "Label options".
Under the Label Options window, you can select the printer and label types. Under Label information, you can select a predefined label type, view the setup of a particular label by clicking the Details button, or you can create your own by clicking on the New Label button. Once you have made your selection, click the OK button.
Once you have selected the type of label you want, Word should automatically select "Use the current document" under Select starting document. To proceed, click on "Next: Select recipients". At that point, you should see "Select recipients". Make sure "Use existing list" is selected and click Browse.
The Select Data Source window should appear. Locate & select your database and then click the Open button.
At this point, the Select Table window should appear. Locate & select the table or query you wish to use, and click the OK button.
The Mail Merge Recipients window will pop-up. This is where you can sort your data, filter your recipients list, etc. After you are finished selecting the intended recipients, you would click the OK button.
This will take you back to the Select recipients section of the Mail Merge pane. Click "Next: Arrange your labels". You will then see the Arrange your labels section.
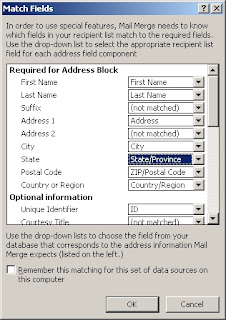
Click on the "Address block" link to bring up the Insert Address Block window. In this window, you can specify address elements and preview the results. If any of the information from your database is not showing up or is incorrect, it is possible that Word was unable to match a field from your data source. To correct this, click on the Match Fields button.
When the Match Fields window appears, make the necessary corrections and click the OK button.

At this point, a warning message may appear:
Click the Yes button and when you are finished making changes in the Insert Address Block windows, click the OK button. You should now see the "<<AddressBlock>>" merge field in the first label area (top-left of the document). Click the "Update all labels" button and Word will the AddressBlock field to the rest of the labels in your document.
To preview your labels, click "Next: preview your labels". Word will pull all of recipients you specified in to your labels. If you need to make changes to the recipients list, click on "Edit recipients list". Otherwise, click "Next: Complete the merge".
This will take you to the final step of the Mail Merge Wizard. If you do not need to edit any of the labels, then click the Print link when you are ready to print.
The Merge to Printer window will pop-up. Select what you wish to print, and click the OK button.
This will bring up the Print dialog box, where you can select your printer and printing preferences. To print your labels, simply click the OK button.
Disclaimer
All content in this post, including the images used, was created by me (except where otherwise noted). All images were created using Irfanview and are copyrighted by me. Use of this material by anyone else is strictly prohibited (unless you ask me really, really, really nicely).


No comments:
Post a Comment