Thursday, February 10, 2011

Steganography and its use with digital images

What would you need to do to send information in a secure manner? Some would immediately say the best way to protect it would be to encrypt the data, and for the most part, they would be correct. However, simply encrypting the information may draw unwanted attention to both the sender and the receiver if the data is intercepted. So, how would you keep anyone from knowing you are transmitting protected data? One solution is called steganography.

According to Wikipedia, "steganography is the art and science of writing hidden messages in such a way that no one, apart from the sender and intended recipient, suspects the existence of the message". Steganography has been around, in one form or another, for centuries (as far back as 440 BC). The fact that it is still used today should prove how useful it can be. In today's digital age, you can hide data in pictures, audio & video files, text -- even network protocols. But, digital implementations of steganography don't just hide the information -- it encrypts it, as well. This makes it much more difficult to discover the payload (the hidden data).

Steganography in images occur as follows: The steganography program analyzes the carrier (the file that will store the hidden data) and the data to be hidden. It encrypts the data to be hidden, breaks it up in to tiny pieces, and replaces various unimportant bits in the carrier file with the hidden data. It then saves the new file to a place of your choosing. In order for someone to reveal the hidden data, they would generally need to use the same software that was used to create it, the encryption method used (if the software allows for more than one type of encryption), and the password/passphrase used to encrypt the data. For a more detailed explanation, please see the Digital Image and Audio section of Gary Kessler's paper "An Overview of Steganography for the Computer Forensics Examiner" or the Steganographic Methods section of his paper "Steganography: Hiding Data Within Data".

There are many steganography tools available on the Internet. Just to give you an idea of how many exist, I encourage you to check out Neil Johnson's list of steganography tools. Here is an example of steganography in action using a program called S-Tools:


The carrier file


Waterfalls By Saspotato


The hidden data file


The resulting stego file


Waterfalls By Saspotato


Here is a tutorial from YouTube that shows how to use S-Tools:


Disclaimer

All content in this post, including the images used, was created by me (except where otherwise noted by links and/or captions). All images were created using Visio and are copyrighted by me. Use of this material by anyone else is strictly prohibited (unless you ask me really, really, really nicely).

Mail merge using Word 2010 and an Access database

There are many things you can do with, or utilize with, a database. You can track website usage statistics, analyze market trends, etc. Just looking at the various Access templates on the Microsoft website shows the multitude of uses for databases. One way you can utilize the information in your database is to create form letters or address labels using the mail merge feature of a word processor.

According to Wikipedia, a mail merge "is a software function describing the production of multiple (and potentially large numbers of) documents from a single template form and a structured data source." Basically, what that means is that, with a mail merge, you can link a document (such as a form letter or address labels) to a data source (such as an Excel Spreadsheet or an Access Database). In this tutorial, I will be showing you how to do a mail merge to create address labels using Word 2010 and an Access 2010 database.


Address Labels

To start the process of creating address labels in Word 2010 utilizing an Access database, click on the Start Mail Merge button in the Start Mail Merge group under the Mailings tab and select Step by Step Mail Merge Wizard.


The Mail Merge pane will appear. You would then select the type of merge you want to do (in this case, it would be labels). After you have made your selection, you would click "Next: Starting document".


Next, you will be given a choice to select a starting document and to change the document layout. Click on "Label options".


Under the Label Options window, you can select the printer and label types. Under Label information, you can select a predefined label type, view the setup of a particular label by clicking the Details button, or you can create your own by clicking on the New Label button. Once you have made your selection, click the OK button.


Once you have selected the type of label you want, Word should automatically select "Use the current document" under Select starting document. To proceed, click on "Next: Select recipients". At that point, you should see "Select recipients". Make sure "Use existing list" is selected and click Browse.


The Select Data Source window should appear. Locate & select your database and then click the Open button.


At this point, the Select Table window should appear. Locate & select the table or query you wish to use, and click the OK button.


The Mail Merge Recipients window will pop-up. This is where you can sort your data, filter your recipients list, etc. After you are finished selecting the intended recipients, you would click the OK button.


This will take you back to the Select recipients section of the Mail Merge pane. Click "Next: Arrange your labels". You will then see the Arrange your labels section.


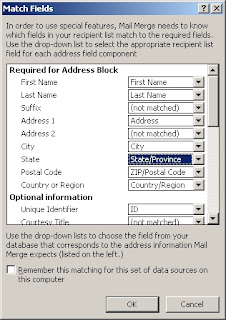
Click on the "Address block" link to bring up the Insert Address Block window. In this window, you can specify address elements and preview the results. If any of the information from your database is not showing up or is incorrect, it is possible that Word was unable to match a field from your data source. To correct this, click on the Match Fields button.


When the Match Fields window appears, make the necessary corrections and click the OK button.


At this point, a warning message may appear:


Click the Yes button and when you are finished making changes in the Insert Address Block windows, click the OK button. You should now see the "<<AddressBlock>>" merge field in the first label area (top-left of the document). Click the "Update all labels" button and Word will the AddressBlock field to the rest of the labels in your document.


To preview your labels, click "Next: preview your labels". Word will pull all of recipients you specified in to your labels. If you need to make changes to the recipients list, click on "Edit recipients list". Otherwise, click "Next: Complete the merge".


This will take you to the final step of the Mail Merge Wizard. If you do not need to edit any of the labels, then click the Print link when you are ready to print.


The Merge to Printer window will pop-up. Select what you wish to print, and click the OK button.


This will bring up the Print dialog box, where you can select your printer and printing preferences. To print your labels, simply click the OK button.


Disclaimer

All content in this post, including the images used, was created by me (except where otherwise noted). All images were created using Irfanview and are copyrighted by me. Use of this material by anyone else is strictly prohibited (unless you ask me really, really, really nicely).

Embedding video in PowerPoint 2010

There are two main ways to embed video in PowerPoint 2010: online and offline. With offline embedding, you are, basically, storing a copy of your video inside your presentation. So, you would not need to have access to the Internet to play it, but it can drastically increase the size of your presentation file. Embedding a video that is on the Internet, such as YouTube, will help keep the file size of your presentation small(er), but requires you to have access to the Internet to view it.

However, you could link to an offline video file rather than embed it, but you would still need to have a copy of the video with you when you play the presentation. You would also need to make sure the video stays in the same location to prevent broken links in your presentation. For example: If you link to a file on one computer that is "C:\videofilename.mpg" and you take it to another computer, the presentation will not play the video unless you copy it to "C:\" on the second computer.


Embedding Online Video

Method 1

To embed a video that is located online, you would need to first highlight and copy the embed code provided by the web site. With YouTube, you may need to select "Use old embed code" to get it to work properly.


Once you have copied the embed code, you can paste it in to PowerPoint 2010 by clicking on the Insert tab of the Ribbon Bar, clicking on the drop-down arrow under Video in the Media group, and selecting Video from Web Site.


At that point, the Insert Video From Web Site window will pop-up. You would then paste the embed code from the web site in to the box provided and click the Insert button.


After the link to the video is embedded, you should get a square on the slide that represents where the video will appear in the presentation. You can move or resize this however you wish.


If you preview the slide in the Slide Show view, it should look something like this:


Method 2

The second method is a little more difficult, but may make it easier to adjust the properties of the video afterward (it all comes down to personal preference). To embed a video using this method, you would need to first enable the Developer tab on the Ribbon Bar. In order to accomplish this, click the File tab on the Ribbon Bar and then click the Options button.


The PowerPoint Options window should pop-up. From there, click on the Customize Ribbon option on the left, check the checkbox next to Developer on the rightmost listbox, and click the OK button.


The Developer tab should then appear on the Ribbon Bar. You would need to click on it and then click the More Controls button located in the Controls group.


The More Controls window should pop-up. Scroll down and select Shockwave Flash Object and click the OK button.


After you do that, your mouse pointer will turn in to a plus sign ("+"). You would then draw a square on the slide to represent where the video will appear.


Once you specify where the video will appear on the slide, you will need to let PowerPoint know where to find the video. You can do that by right-clicking on the square and selecting Properties.


The Properties window should then appear. You will need to copy and paste the web address, or URL, in the section to the right of the word "Movie". If you are pasting a link from YouTube, you will need to modify the link to remove "watch?" from it and change the "=" to a "/". You can also change various options on how the video will playback during the presentation, such as whether the video will automatically play as soon as you view the slide or if the video will loop after it is done playing. When you are done adjusting the properties of the video, you can simply click the "X" in the top right of that window to close it.


If you preview the slide in the Slide Show view, it should look something like this:


Embedding Offline Video

To embed a video that is offline (located somewhere on the computer you are using to create the presentation), click on the Insert tab on the Ribbon Bar, click on the drop-down arrow under Video in the Media group, and select Video from File.


The Insert Video window will pop-up. Locate and select the video file you wish to insert and click on the Insert button. If you wish to just link to the video instead of embedding it, you would need to click the drop-down arrow next to the Insert button and select Link to File.


A box representing your video should appear on the slide. You can then move and resize it however you wish.


If you preview the slide in the Slide Show view, it should look something like this:


If you wish to save disk space and increase the playback performance of the video, you can compress your video from inside of PowerPoint. However, doing so will probably affect the quality of the video. You can also optimize the compatibility of your video just in case you are going to use a different computer to run the presentation. To access either of these options, click on the File tab of the Ribbon Bar, and under the Info section, you can select Optimize Compatibility or Compress Media.


Disclaimer

All content in this post, including the images used, was created by me. All images were created using Irfanview and are copyrighted by me. Use of this material by anyone else is strictly prohibited (unless you ask me really, really, really nicely).